meta data for this page
Options
The program is known for it's many options and possibilities to get the data you want. By default everything is setup to be optimal for most customers, but of course everything can be optimized to your needs.
Program behavior
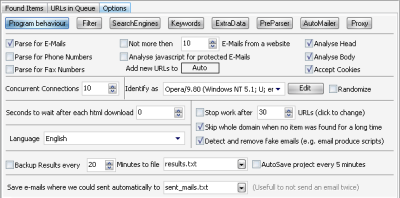
Not more then XX E-Mails from same host
This will only extract so many e-mails from one website in order to not grab a high number of e-mails who possibly have nothing to do with your entered search-keyword but are listed there in addition. Please note that this counter is reset on each new URL from that host.
Analyze javascript for protected E-Mails
Some sites use javascript to hide there data from parsing programs. If you enable this option, then the program will try to analyze the javascript and extract the data anyway. This however doesn't work always but can safely be left enabled.
Analyze Head/Body
The downloaded html page will only be analyzed for the chosen parts. A web page consists of mainly 2 parts. A head where the web page is described and the actual content (body). In most cases you want to analyse them all.
Accept Cookies
When parsing websites, some servers store certain settings on the clients machine. This can be various things like the search keyword or a page number. It is a good idea to let this enabled. You only have to disable this in special cases where e.g. a server identifies you on a set cookie and then doesn't allow more than XX downloads an hour.
Add URLs to
When a new URL is found that should be parsed, it is put to the “URLs in Queue” box. You can define where the program should put it.
Concurrent Connections
This will define how many pages should be analyzed simultaneously. Please set this option with care. We had good results with a value of five. To high numbers will result in to much memory usage and an in-stable system.
Identify as
Each browser identifies itself to a webserver with a special string when it downloads a website. If you use e.g. Internet Explorer, it is known by the webserver and in some cases it shows you a different site as when you use the Opera Browser or FireFox. You can also add new Browser-Identifications here when pressing “Edit” and let the program choose a random one when you check the “Random” box. However leave it to the default setting and it should be good in most cases.
Stop work after XX minutes/URL/Items
Normally the program will run until there is nothing in the “URLs in Queue” left. In some cases it would be enough if you e.g. got one E-Mail from an URL or if you have parsed 100 URLs or if you have already parsed for like 60 minutes.
Seconds to wait after each Download
Set this to e.g. 1 to slow down the CPU usage if you have problems with it.
Backup Results every XX Minutes to file YY
In case your system is kinda in-stable it would be good to save the results of the project to a file automatically so that you don't have to restart the whole progress again.
Save e-mails where we could sent automatically to.
If you make use of the Automailer, then you probably don't want to send the e-mails twice. This option collects all successfully send e-mails to one file. The program will check new e-mails against this list and will skip sending them if they are in it. If you plan to send e-mails to the same people again, you have to either delete them from this list or change the name of the file. A restart of the program might be required.
In latest version you have an EDIT button next to that field where you can erase certain E-Mails. When creating a new project, it would be wise to also change the file name there to avoid future trouble.
Skip whole domain when no item was found for a long time
When you are parsing an URL with a lot sublinks and no Item was found for like 100 links, then the all URL with the same domain get removed from the Queue.
Detect and remove fake emails (e.g. email produce scripts)
A quick test is made if the email domain really exists and not some fake email was generated by a script.
Filter
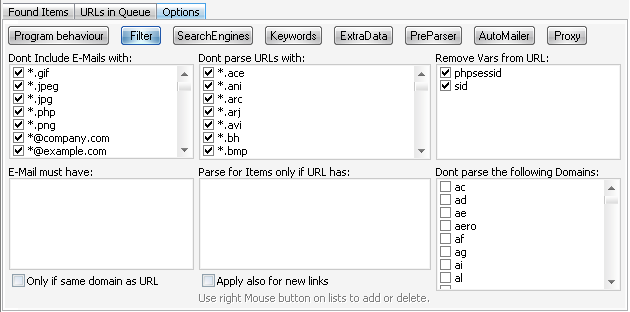
Here you can define in details what to parse and what not. New items can be added and modified when you press the right mouse button on a window. You can use the following syntax:
| *something* | will match if something is in the string, a “*” stands for any possible character |
| !badword goodword | will match if badword is not in the string but goodword is |
| simpleword | will match if simpleword is somewere in string but before and after it is a none alpha character. |
Search Engines
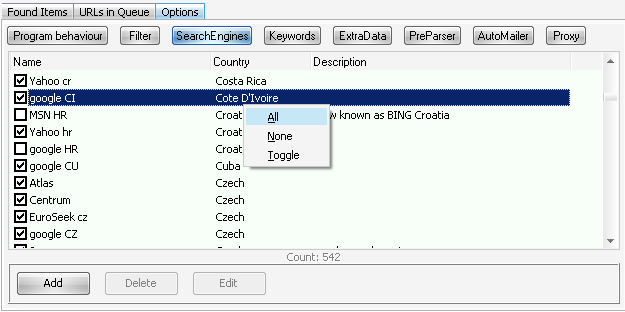
Here you can select the search engines you want to use. Please note that most of these search engines will also deliver result in other languages then the one in the second column. You can open a pop-up menu when clicking with the right mouse button on the list.
You can also add new search engines.
Keywords
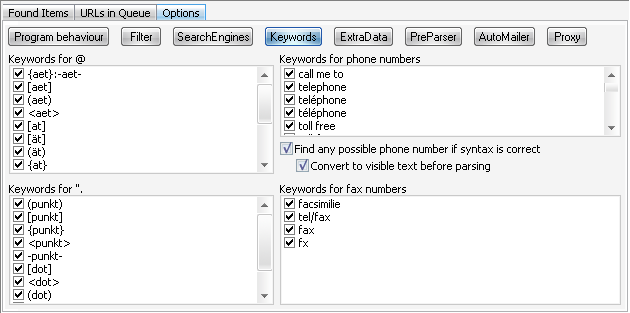
In some cases you might not be satisfied by the results of the program if you search for phone or fax numbers. This can happen when you have a different word for e.g. „phone“ in your language that is used on the page. You have to enter it here (right mouse button on the box) and you will get the results you want. The program has all English, German and French words for „phone/fax“ included though.
You can also add more place holders for the @ and . sign that is often replaced on web sites to make it harder for programs like ours to locate the email address.
For the phone and fax numbers you can also add the prefix phone numbers that they should have (e.g. +49 482). If you uncheck everything else, it would work as a filter to only accept numbers from that region.
Extra Data
This feature will let the program get extra data for each found email/phone/fax. Extra data can be anything you will be interested in like the address or customers name. Of course this information is not available on each result and needs you to configure it.
- Take page title as extra data
- Discover country/city for email (taken from domain)
- Take page keywords as extra data
- Take search keyword(s) as extra data
- Take page description as extra data
The extracted data will be shown in the column “Extra” on the tab sheet where the found items are listed.
Options – PreParser
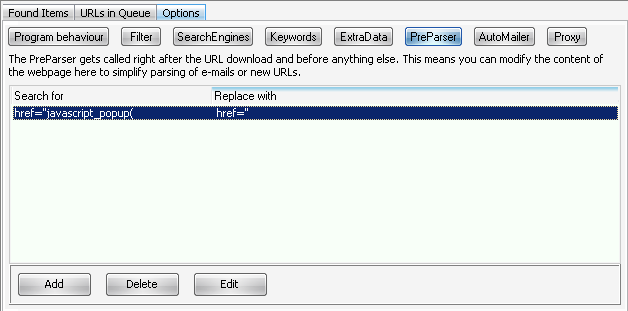
This option is for real advanced users who want to modify the content of a downloaded web pages before the parsing is started. You can e.g. Search for href=“javajopup( and replace it with href=” to make sure the program can also extract those links and spider them. Just leave this option if you don't know what its for. Of course this makes only sense if you use the method to parse special websites where you had a look at the source of the html and found a way to make crypted emails by javascript more readable.
AutoMailer
ATTENTION! Using the auto mailer function might be illegal in your country. And in no way should this program be used for SPAM.
When the program finds new E-Mails it's often wanted to send them a message. Here you can define what to send them and how. For this purpose you can define different templates if you plan to send them E-Mails in their possible language (recognized at the host of the email).
In the email template you can also use the following place holders to make the email message more personal.
| %email% | the email of the customer |
| %url% | the url where you found it |
| %domain% | the domain where you found it |
| %subdomain% | the domain of the url including subdomain |
| %domainpart1% | just the part of the domain till the first “.” |
| %extra% | extra information you crawled |
| {word1#word2#word3} | one of the words in the brackets gets inserted |
By default the email is sent as text only message. But you can also define a html message with different colors and text styles as seen in the screenshot above. Attachments are not possible and if you want to use images in the email you have to use links to an online resource. See article “E-Mails with Images” for more.
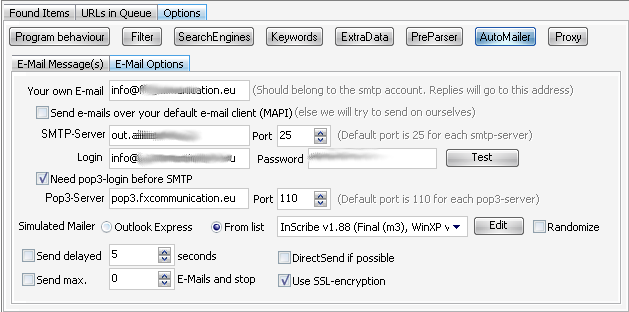
On the “E-Mail Settings” you can define how to send the email.
The Pop3-Server as well as the SMTP-Server and the Own Email are required to send mails normally over your E-Mail provider. Of course the Login and Password are also needed.
Please note that the login could be different from the email name for your email-provider. If you don't know what to enter then have a look into the settings of your mail-program like Outlook or search the FAQs of your email provider for details or see this listing of email providers and their settings.
When sending mails with the program you have to make sure that no other email-client is logged in as this might result in a rejection from the mail server.
You can use another option here called DirectSend if possible. This will send mails directly without the need of an SMTP- or Pop3-Server. So you only have to enter something in Own Email address. However this feature doesn't work for all the emails where you want to send to. Often the connection from unknown IPs (as your PC is), is rejected. To avoid it you should always enter the Pop3- and SMTP setting to send emails over that system if case DirectSend fails.
Own Email is the E-Mail that the customer will send a reply to. So if you want to get feedback, you have to enter a valid email here. You can also write there something like %random%@my-host.com. In this case, the %random% string will be replaced with a random characters. This is useful if you want to change the email on each email you send out.
Simulated Mailer is an option to pretend that the sent e-mail was written by one of the e-mail clients in the list. It is recommended to use “outlook” as its one of the most common e-mail clients. However if you want to use something else use the one from the list or simple choose random.
If your TEST E-Mail arrived, you can switch the automailer on as seen on the screenshot above.
If you see no activity in the status column, than you might have configured the email message wrong. Make sure that email is matching any of the masks you defined in the templates. Else the default template is used but only if there is some message in it.
You can use many macros here for the login you can e.g. use %email% for the whole email or %emailuser% for the part before @. This way, you can e.g. use the spin syntax in the smtp server field to send emails by a random provider/account. However make sure the password is the same then.
Proxy
Proxies are used to hide your identity from others or to be able to get online at all on restricted internet access locations. Either you have a fixed proxy or a list of proxies.
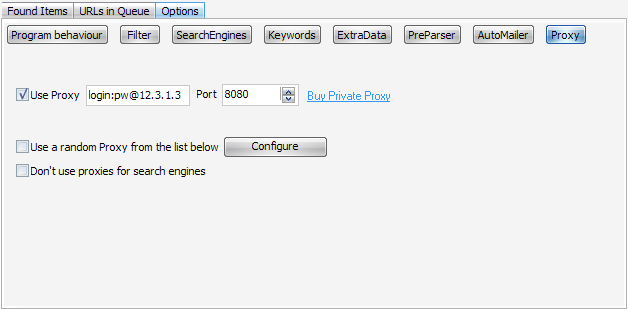
For fixed proxies you simply enter the IP and Port in the screenshot above. If you have to use a login and password, you use the format login:password@IP/host.
If you have no proxies and still want to be anonymous, you can use the build in proxy searcher and tester. Just click the “Configure” button. The proxy option dialog is the same as used in GSA Search Engine Ranker and other programs from GSA.


